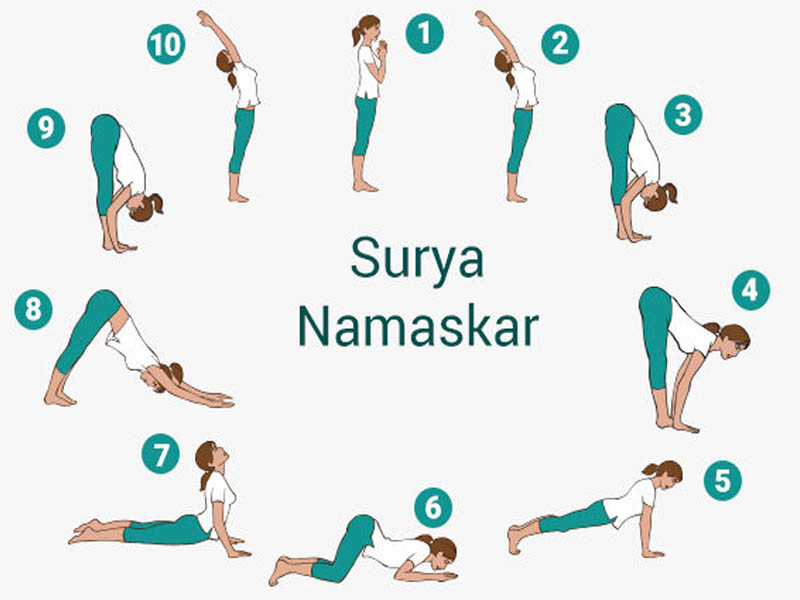
Sun has always been an essential part of human life. Accordingly, no life on Earth can exist Earth without the sun. Hence, there is one of the most prominent yoga postures, which is Surya namaskar. There are 12 poses of Surya namaskar that need to be performed accurately.
While there are various benefits of Surya namaskar steps, it is also necessary to perform every step accurately. If you are a beginner, you need to understand the basics. With so many steps, it can often be overwhelming to do it accurately.
However, some experts offer classes of Surya namaskar for beginners. If you are a beginner, you can either join one of these classes or watch tutorials from youtube. To master the entire pose, you need to master each one of the 12 poses of Surya namaskar.
What are the 12 poses of Surya namaskar?
Once you understand the benefits of Surya namaskar steps, you can perform each of them accurately. Surya namaskar is one of the most prominent cardiovascular exercises. If you don’t have enough time in your schedule, half to one hour of Surya namaskar is enough.
Moreover, the 12 poses of Surya namaskar also make it easy for you to relax. It is one of the best reflective yoga postures that help to maintain a slow pace. Moreover, if you practice these steps regularly, it can be beneficial.
Pranamasana
This is the basic or initial step to Surya namaskar. It is also known as pranamasana. While performing this pose, it is extremely necessary to activate the legs and keep the spine erect. Furthermore, regular breathing is extremely crucial. Whenever doing this pose, you need to stand straight on the may distribute the weight equally throughout the body.
Hastauttanasana
This pose is also known as raised arms pose. You need to breathe in and stretch towards the back. Therefore, it is important to stretch the entire body. If the body is in a stretched position, the blood flow in the body increases. Furthermore, it is necessary to ensure that there is proper stretching in the body. This helps to avoid excessive bending.
Padahastasana
In this pose, you will have to retain the standing forward bent posture. After holding on to the previous position, you will need to exhale and bend forward. However, it is necessary to keep the spine erect while bending forward. Make sure to touch your feet using both hands.
Ashwa sanchalanasana
This pose is popularly known as the equestrian pose. First, you need to gently breathe in and out and stretch your leg to the back. Next, bring your right knee towards the front position and place your head up. When you are in this position, you need to retain the position for some time.
Dandasana
This pose is also known as the stick pose. After releasing the previous position, you will need to bring your entire body in a straight line. Thus, it feels as if your body is a stick. However, it is crucial to maintain straightness and keep the arms erect when performing this pose. Maintaining the position can be of great help for allowing your body to relax and boost the blood flow.
Ashtanga Namaskar
After releasing the previous position, you need to bring some balance to your body. This happens to be one of the most crucial from the 12 poses of Surya namaskar. When you are in this position, you need to ensure that the parts of your body touch the ground.
Bhujangasana
This pose is also known as the cobra pose. It is one of the main poses that help to boost the flexibility of the body. It would help if you were very gentle with your movements. This position reflects as if you are in the position of a cobra. Furthermore, it is crucial to ensure there is a substantial difference in how the body. The head and torso need to be in a raised position.
Adho Mukha Svanasana
This is also known as the downward-facing dog pose. While the chest needs to face downwards, your back needs to be in a raised position towards the ceiling. It is very necessary to ensure that you lift your body gently towards making the inverted V position. You need to stretch your body carefully while inhaling and exhaling. To maintain the focus, you need to face your navel.
Ashwa sanchalanasana
Once again, you will need to repeat the equestrian position. This helps to ensure that your body is coming back to its normal position. You must perform the exercise carefully and maintain the deep stretch. Your body needs to be in a perpendicular position. Make sure to ensure that you are deepening the stretch.
Hastapadasana
While performing these poses, you are coming back to the normal form. It is essential to keep a check on your breathing techniques. If required, you may bend the knees. In the techniques of Surya namaskar for beginners, they usually start off with bending the knees. However, as time passes, you will need to learn to straighten the knees. While doing the exercises, you should not break the flow of breathing.
Hastauttanasana
In this pose, you are coming back to your normal position. When you get up, make sure to breathe in gently and roll the spine. The hands and back should be moving backward and bending slightly towards the hip. According to the rule, the biceps should touch the ears.
Tadasana
This is the final pose of Surya namaskar. It involves coming back in a straight position. This helps to relax all the sensations within the body. It is also known as the mountain pose.
Once you are successful in completing one round, you can move towards practicing three more rounds. You must start from the initial stages and continue till the last.
Each step of Surya namaskar is crucial. Therefore, it is necessary to practice the 12 poses of Surya namaskar carefully. If you are a beginner, you need to get in touch with professionals who can assist you in the process.